I like running big, sprawling outdoor ranged encounters in my campaigns, so I’ve built up a collection of trees as detailed in posts like this one, and this one, and (sort of) this one. I hadn’t done any pine trees yet, though, mainly because I liked the results that Jeremy of Black Magic Craft got by modifying cheap craft-store Christmas village trees… but they’re only available from around Halloween until the end of the year.
Well, “Please stop bombarding me with Christmas stuff already” season is in full swing and Michael’s has had them on sale, so it’s pine tree time!
Another Pine Mess You’ve Gotten Us Into
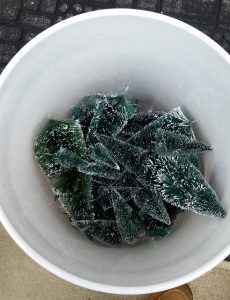
Prepping the trees themselves was fairly simple. After pulling off the plastic bases, I soaked them in a bucket of water for a little while and then used a wire brush to scrub the thick white snow flocking off of them. Then for each tree, a dip in water-and-PVA was followed by a heavy sprinkling of fine flock – I used some of the Woodland Scenics stuff I bought a while back and some homemade sawdust-and-paint variety.
I poked holes into some old foam pieces, jammed the trees in, and left the assembly to dry. I would later add a sprayed-on PVA+water coat to help keep the flock in place.

No MDF for Me
For the bases in the videos above, Jeremy cut pieces of MDF board, coated it with textures, and drilled holes in it to secure the trees in place. I didn’t have any MDF board around, nor the tools to cut it, and these weren’t investments I wanted to make at the moment.
What I did have around was most of the big sheet of ePVC I’d bought a while back for the modular rivers I still haven’t gotten around to making. That seemed like a good material since it’s not prone to warping like cardboard is, but it introduced a problem: it’s not as thick and strong as the MDF used in the original project, so drilled-in tree-holes would probably not be secure.
The solution I decided to try was to glue the original bases into place as mounting points for the trees, then try to cover them up and blend them in. This would result in a slightly hilly look, but I didn’t think that would detract from it much.
So I started by laying the ePVC sheet out on the basement floor and randomly scattering the three different sizes of tree bases across it. I drew size-appropriate circles to mark the tree-base locations, then drew rough outlines around groupings of trees, resulting in something that looked like this:

I used a razor knife to slice the sheet into pieces, then strong shears to trim down and round off the curves. I tried E6000 adhesive to glue the tree-bases to the ePVC mainly because I had a tube of the stuff on hand right next to me, and it seemed to work well enough.
I had a couple of small pieces of mold-cast plaster stone around that were given to me by the owner of a local train store after a fairly long conversation with him while I was in there looking at casting and flocking materials. I wanted to use them here and give a try at a rock-painting technique called “leopard spotting”, so I used those and a bit of XPS foam to build up some rocky hills and outcroppings on a few of the larger pieces.
At this point, my bases looked like this:

After the above photo was taken I also used a knife to cut angles around the edges of all the pieces to smooth out their transitions to the tabletop.
A few of the pieces had some gaps that would need filling between the stone bits and the foam or bases nearby. I’d been planning to give a try at making and using some of the home-made version of Sculpt-a-mold – in this case basically plaster of paris mixed with shredded toilet paper – so I decided this would be a good time to do so. I could skip the plaster stuff and just make enough of the eventual texture coating to fill in the gaps, but I liked the idea of trying a different filler.
The Difference Between Screwing Around and Science is Writing it Down
While waiting for the black-and-mod-podge on the foam pieces to dry, I discovered a second potential problem with my plan based on my use of ePVC: according to a YouTube video that I can no longer find, sculpt-a-mold and its home-brew equivalents don’t stick well to ePVC! I asked around on FB crafting groups and folks suggested that scoring the board first would make it adhere well enough.
This called for an experiment!
I started with three ePVC scraps. I left the surface untouched on one of them, scored one with criss-crossing lines, and applied a rough grit sandpaper to the third. I also mixed up three fillers: some regular DIY plaster/TP, another version with some PVA added, and a bit of caulk with sand and glue mixed in (to represent my plans for the eventual textured over-coating). Three materials each on three different textures, and I was going to do a side-by-side detailed comparison.
Except it wasn’t really necessary.

The plaster mixes, PVA or no, textured surface or not, consistently broke or popped off from flexing or with a decent push from my thumb. The caulk mix wasn’t dry enough to test well at the time, but was clearly sticking much better.
So did I follow the evidence and abandon my plans for using plaster as filler? No! Of course not!
On the few places I was going to use it, there was foam, plastic, or rock mold glued firmly in place that it could adhere to. I sprayed some primer onto the ePVC and plastic in the hopes that it would give the plaster something more to adhere to, and hoped that the combination of materials and the outer coating would be enough to keep everything in place.
When the filler was in place and dry, I mixed silicone caulk, sand, some dollar-store Italian seasonings, and even the dry contents of a tea bag or two. I also threw in a bit of the bulkier sawdust that was left over from what I sifted out to create flocking a while back. Lastly some PVA and water turned the mixture into a many-textured sludge. I proceeded to coat all the bases with this subtance, trying to build up around the plastic tree bases so the slopes around them looked natural and gradual.


Texture Troubles
Once the sludge was dry I base-coated everything with a brown spray paint.
The rocky surfaces were painted white, then treated to random dribbles of ochre and dark brown washes. These were followed by a light brown wash all over. After fully drying, I sprayed on more water/PVA mix, let that dry, and then added a black wash over it. The effect is subtle and I may have lost some of the intended look by washing over a painted surface instead of fast-absorbing bare plaster, but I thought it still turned out well.
Turning my attention back to the non-rocky parts of my bases, I started on some light dry-brushing and trying out some brown and black washes. After some experimenting I still wasn’t happy with the look; the texture just wasn’t working for me and no amount of paint (including the accidentally-dribbled-on dark spots seen below) seemed to help.

The problem with the sand-and-leaves-suspended-in-caulk mixture was that it looked like a sand-and-leaves-suspended-in-caulk mixture. It needed something more.
I took a bit of my grout-and-soil mixture and added a small amount of charcoal-colored powder of the sort used to add color to mixed concrete, just to darken it up a bit. After a water-and-PVA spray over everything, I lightly sprinkled grout mixture over the whole set, carefully avoiding getting much on the rocks. Another water-and-PVA spray preceded a direct sprinkling of some more seasonings, and now things were looking much better and more forest-floor-like.

I added yet another PVA-water spray at to make sure the herbs were well sealed so they wouldn’t crumble easily or fall off. At this point the sun had gone down, so I moved everything back into the garage for the night to dry there.
The temperature dipped down to around freezing that night, which I assume is to blame for the odd thing that happened: some of the PVA seemed to have pooled on the surface and dried into a white haze, leaving odd milky blotches all over my otherwise-now-acceptable textures. I tried dripping water on the affected spots but it didn’t clear them up.
So… more texture! I repeated the re-texturing process with slightly darker soil this time, and sprinkling a lot less material, mainly focusing on covering the glue spots. This time I made sure my bases had all day to sit out in the sun and dry thoroughly.

Finally I had a blotch-free, organic look!
Planting the Trees
All that remained was to attach the trees. I had to use a pin vise to find and re-drill some of the holes in the original bases, but it was a simple exercise. More E6000 secured the trees in place.
Somehow I ended up with one less tree than I had bases for.
As an afterthought I also glued on a few small grass tufts here and there.

I still need to smooth out some indentations from my fingers, obviously, but I’m leaving them for now to simulate something big having moved through the forest in the run-up to a near-future white dragon encounter in my campaign!
Lastly, I decided to give a few of the pieces a light dusting of snow flock for a more wintry feel. Since this was likely to mask some of the texture I’d worked so hard on, I chose some of the less interesting ones for this.

Pingback: A Diorama, Photos Forgotten, and Lessons Learned - (Re)Turning (to) the Tables
Pingback: Paving the way to adventure? - (Re)Turning (to) the Tables