For a while I’ve been suspecting that the matte Krylon clearcoat I’ve been using has been muting or graying colors in many cases, though I was never really sure it wasn’t just a natural muting as the underlying paint set. I’ve pretty much confirmed the former, though, after waiting a few days between painting and coating this latest set of minis.
The likely culprits are August heat and humidity, and the reason the muting is so prevalent this time is that I’m home on what passes for my vacation and have been doing some spraying during the day as opposed to a quick coat before leaving for work or an evening after-dinner spray.
A few sort-of-fixes short of a full repaint have been suggested to me, and I’m going to dabble both in using some other products for my final coat and in making sure I only use the Krylon in better weather conditions. I expect I’ll report back on my results in a future post.
Spider-base paint, spider-base paint, paint wherever the spider ain’t!
… is what I found myself singing while working on these. I was still mulling over what sort of paint schemes to try on the actual arachnids but I wanted to get started on them anyway, so I worked on the bases.
The web-like textures on the smaller spiders were part part of the 3d model they were printed from. I realized only after they were printed that “giant spiders” of the sort I wanted for D&D were supposed to be size “large”, meaning sized for a 2 inch base instead of 1 inch. Every larger model spider I tried to print had its legs fall apart, except for the single survivor of its brood shown below. Its base is a wooden disc with some crushed coral and my dirt-and-grout mixture. All the bases were coated with Army Painter “Dirt Spatter”. Rocks on the big spider’s base are A.P. “Dark Stone”, and I decided to try out Citadel’s “Wrack White” dry paint for dry-brushing. (Preliminary verdict – interesting but not really necessary.)
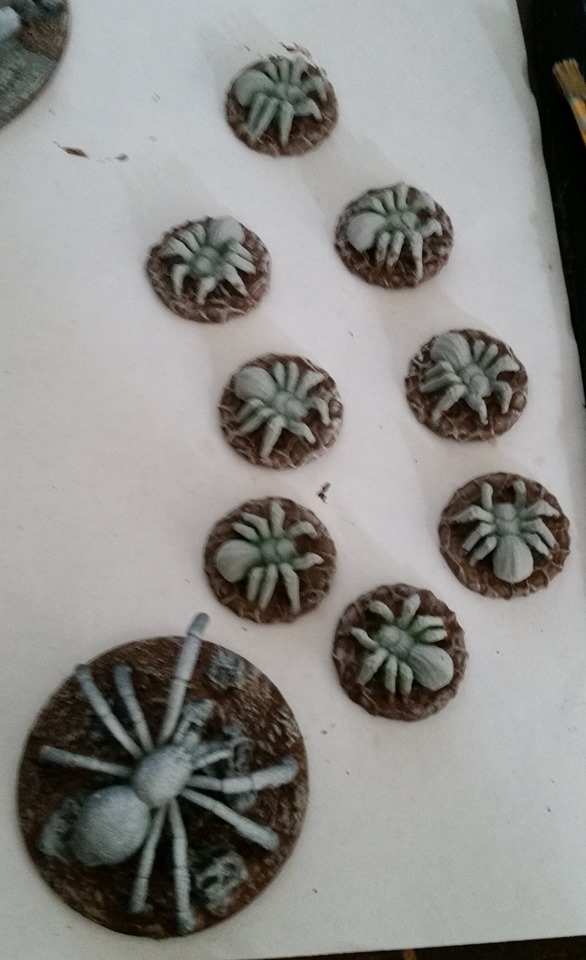
For the spiders themselves, I used a variety of browns and very dark grays on them, experimenting with different washes as well. Unfortunately I didn’t take a “before Krylon” picture of them, because of all the pieces I worked on they were the most affected by the hazy coating. The noon August summer sunlight under which I photographed them didn’t help matters much.

Grays were lightened drastically and browns in some cases started to look yellowed. Bleh.
The Doppel Gang is back in town…
I still have a bunch of Heroclix figures lying around in various stages of paint removal waiting to be prepped for use. Several of them when “naked” struck me as somewhat doppelganger-ish, so I glued them to some 1″ discs and painted them up.
Most of the images I’ve seen of these creatures show them in hues of blue, with a lot of dark shadows across their features. I decided on a blue base coat but wanted to make them a little more alien by using a dark purple wash on them. The Heroclix figures apparently didn’t have enough textures on them for the wash to be effective, though, so I settled for just letting the washes give them a little purple tone and then dry-brushing over with the original blue. It came out… okay, I guess, for the limited textures I was working with…

… until the clearcoat made it look grainy and nasty. (Also, you can still tell that one of them used to be Venom.)
They might be (fire) giants
I’ve started working on getting minis printed for Storm King’s Thunder. We’ll be skipping the few low-level parts at the beginning and using the built-in Phandalin link to start off with the attack on Triboar. This features some fire giants, so they were the first giant variety I printed.
This was also the point where the LCD screen of my Photon picked up a few dead spots, which resulted in holes in the giants’ legs. Even after noticing, I kept on printing them, hoping to be able to patch them with Milliput rather than stall my mini-making long enough to wait for a replacement LCD to arrive. On the down side, my patching results were less-than-wonderful. On the up side, this made them perfect for me to use as my first attempt and painting more complex, multi-colored, multi-textured minis, because I wouldn’t feel too horrible if the spackled-leg-hole giants came out poorly.
Not only do I think they came out pretty nicely given my newbishness, but they seemed to suffer the least from the clearcoat disaster.

D&D fire giants have coal-black skin, so I tried the Black Templar contrast paint on the hands and faces. Not very contrast-y results, but they’ll do. These giants’ hair seems to be depicted as alternately either bright orange/yellow and flame-like or actually on fire, so I went for a look that could suggest a little of either. I painted them orange and then watered down a small bit of yellow and dabbed it in a few spots while the orange was still wet.
“Plate mail metal”, “Weapon bronze”, and “Shining silver” were applied to the armor, hilt, and sword, respectively. Fabric was “Chaotic red” or “Gryphon blue”. All but the head received a dark wash; two got Nuln Oil and two got Dark Tone. These made the flat surfaces a little darker than I wanted and a little blotchy, so I followed up with a light dry-brushing of the original colors over the metallics. For the fabrics I highlighted some of the edges with a slightly lighter blue or with a mix of the Chaotic with a small amount of a brighter red.
I didn’t have any of the 3″ discs needed to properly based these for the correct D&D scale. Instead of plastic mini bases of that size, which seem to cost 6.99 for 10 of the flimsy-feeling hollow types or 5.99 for a single disc (and me with a lot more giants to print!), I found a 36-pack of 3″ wooden circles for for $10.99 and went with those. Having heard a bit about the usefulness of cork as a basing material, I also picked up a stack of small cork sheets in the same order.
The elevated, flat areas shown on the bases were made from torn-off bits of cork a glued a layer or two thick with PVA. When I started painting the cork itself it became clear that – in spite of having been primed – it was still going to soak up a lot of paint; so I switched over to the cheap craft paints for it. I think next time I try cork I’ll give it a coat of mod podge or PVA before it’s even primed to see if that creates a better look by blocking so much absorption.
Since the giant’s feet were large enough that I felt comfortable that I wouldn’t destroy them in the process, these also marked my first attempts at pinning minis to their bases. I used a pin vice to drill tiny holes in both feet, then super-glued in paper clips, snipped so they stuck out at about the depth of the cork. When those dried securely, I applied glue to the bottoms of the feet and to the projecting paper clips, then pushed them into the cork to secure the figure. Seems to have worked pretty well, but I’m still scared to try it on smaller minis.
The giants were only impacted a little bit by the clearcoat issues – particularly where bits of the faces have grayed. I might dribble a drop of dark wash on one of them to see if that helps, but otherwise I’m content to use these as is – battle-damaged legs and all.