I’ve been light on the crafting posts lately because I’ve got something like five different projects in various stages of completion, but nothing finished to post about. It’s likely that in a couple of weeks there will be a flurry of updates about those efforts.
In the meantime, last night I embarked on a project to craft some… er… boxes.
You see, my collection of tiles – both the original double-sided ones and the later cavern ones – were being stored in medium-sized plastic containers in what had become a very haphazard way – just loosely tossed in after use, forcing me to rifle through piles of them to find what I need when setting up new scenes. I wanted to get them organized, so… boxes.
I planned to move all the tiles if possible into a single, larger plastic tub as well, so my tile-box measurements started with a box length that would fit the width at the bottom of the plastic container. That measured out to just under 13″, so I went for 12″ lengths. Given that most of my tiles are 3″x3″ or derived from 3×3 squares, a 3″ width was an obvious choice – though I added 1/4″ to that just to allow 1/8″ of wiggle room on each side to make sure that, for example, bad folds didn’t end up making for a box that tiles had to be forced into. I wanted the side walls of the tiles to be partially visible; in the case of the cave tiles, this made it easier to identify at a glance which are passageways and which are border pieces. So for the side walls I decided on 2 1/4″ heights.
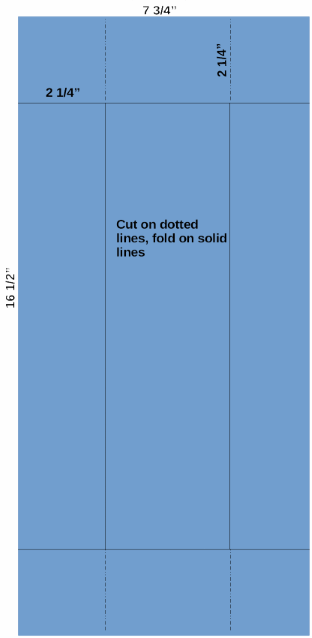
I still had the big, flat box my piece of ePVC had shipped in a while back, so I sliced that up into a stack of appropriately sized rectangles based on my measurements. Based on the diagram shown, I made a single “master” copy as a template and simply laid it over each of the other pieces and made the necessary cuts. It didn’t have to be too exacting. I used a straight edge across the fold lines to make for cleaner folds.
When all the pieces were cut and folded, I dabbed white glue on the flaps, overlapped them with the end pieces and held them together while attaching packaging tape keep everything in place. (Be sure not to leave the sticky bits of the tape exposed anywhere – it’s likely that a tile that sticks to it could be damaged while pulling it off!) Let the glue dry, and now you’ve got a pile of tile organizers. I briefly flirted with the idea of labeling them, but decided it wasn’t necessary.
Now my tiles are better organized, safer, and easier to find when I’m setting up an encounter. I had enough boxes left to also fit in my dungeon stackers, my 3×6″ tiles, and my small number of 2″ wide tiles as well. I don’t currently have enough individual examples of the larger tiles to warrant separate boxes for them, but if at some point I make more, I’ll use this same technique for those.
