The most loosely-defined item on my crafting to-do list amounts to, essentially, “make some modern stuff to use in the (slowly-progressing) Mighty Protectors campaign“. I wanted to make some scatter, such as dumpsters, pallets, and the like, but beyond that I wasn’t entirely sure where I wanted to go with it.
Recently, though, while trying to lay out a plan for our next few sessions, I decided that the final confrontation with the currently developing Big Bad and his minions would take place at the oil refinery in Delaware City not far from here. With this plan in place, I could start thinking about more specific ideas to work on.
This post, however, isn’t the result of that decision, though its products will be used in the eventual refinery scene.
Revivifying an old project
This post is actually about an old build from March or April 2019 that I never got around to posting about because while it was mostly finished, it still wasn’t ready. It was the next project I started after the dirt road segments I made a while back, and though it was one of my early efforts it worked out relatively well… except for the severe warping that made the surfaces unusable in any context! I’ve long meant to do a quick post about it as a hopefully useful “here’s what I think I did wrong, so you might not want to do it this way” example, but somewhere in the back of my mind there’s been a subroutine running that was pretty sure it was fixable, somehow.
So I waited, and have probably forgotten many of the details, but I’ll give this a try anyway.
The Road to Ruin
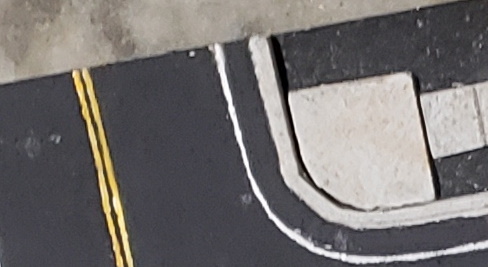
The basic goal was to make a set of modular modern street and sidewalk parts I could put together in various configurations on my table. I started the roads by cutting some straight pieces and a few intersections from some squares of heavy chipboard. I glued thin strips of dollar-store foam to the edges to serve as curbs.

At the same time I cut some 1″ wide strips of foam, along with some slightly larger squares with one corner rounded to fit in the curves of the road intersections. After peeling off the paper, I used a pen to gouge lines across the strips at 1 inch intervals to simulate sidewalk segments.

I also splotched rusty colors onto a few pennies and some pieces of plastic embroidery grating to make drains and manhole covers. These were wrapped in masking tape and taped down where I intended to place them on the roads; this way the texturing step wouldn’t cover those locations.

I experimented with a variety of paint and wash combinations for the concrete areas until I found a combination I liked:

Next I mixed up samples of a few different combinations of ingredients to test a texture goo. I mixed different amounts of sand with both Mod Podge and PVA, added the samples onto one of the off-cuts from the road parts, and painted them with a pavement color.

In retrospect I can’t remember for sure which option I chose, but I think it was PVA with a lighter amount of sand, because too much sand resulted in clumping that would be fine for ground cover but look out of place on a road surface. The resulting goo was smeared over every upward-facing surface on all the road and sidewalk pieces.


When the texture was dry, all the surfaces were painted and the grates and pennies were glued into place. They looked a little odd because the texture I ended up going with wasn’t very deep, so they rose above it a little. If I try something similar again I might try to sand them thinner or dig indentations into the chipboard so they’ll sit lower.
Coloring outside the lines
I cut a thin line out of a strip of cardboard and tried to use it as a stencil to draw out white and yellow lines on the road surfaces, but the paint bled and ran among the sand particles and in general made a mess that had to be painted over. I ended up asking my wife – who has actual artistic training and talent, steadier hands, and more patience than I possess – to see what she could do with them. She ended up meticulously painting on the stripes by hand with a small brush; it still looked a little rough because of the texture underneath, but the results were far better than my attempts produced.
The road crew was pretty hung over the last time they repainted. That’s the excuse I’m going to use when people see those lines.
Let’s do the road warp agaaain!
Sidewalks now looked good and the roads were, well, less bad looking than they’d been immediately after my striping efforts. This project would have been complete, were it not for the undeniable fact that the shrinking of the PVA on the surface of my road segments and intersections had warped the chipboard bases so badly that they were now effectively see-saws.

I tried the trick of painting Mod Podge on the undersides in the hope that its shrinkage would pull the pieces back in the opposite direction, but it didn’t help much. I laid everything out on the smooth garage floor with heavy boards stacked on top and left them that way for days… but they curved right back when the weights came off. Eventually I tossed them into a storage bin and moved on, except for those vague background thoughts about looking for another way to solve the problem.
Months later while walking through the local Lowes Depot, I spotted some really cheap self-stick vinyl floor tiles, and something clicked. If I glued the road pieces down to these, would the tiles’ mass be enough to stop the warping?

I brought home enough tiles to make the attempt. I started by picking out two road segments that would fit side-by-side on a single tile. Rather than relying on the adhesive on the tile backs themselves, I sprayed on some Super 77, which seemed to do the job. With the road parts attached, I examined the results.
The roads were flat again! Until I came back an hour or so later, that is. The warping was reduced a little, but was definitely still there. A little dejected, I decided to try the flattening-on-the-floor trick again to see if it would work better with the tile backing.

Weighted down with 2x4s and a big ceramic flower pot, then left overnight, and the warp was gone!
For a little while.
Again.
I laid the tile back on the floor in an out-of-the-way spot and put the weights back on it, but honestly I had pretty much dismissed the tiles as a potential solution at this point. Maybe glue the roads something less flexible? How thick would that make them, and how high above the surrounding surfaces would they rise on an actual game table?
It was probably a month later while doing some clean-up and reorganizing in the garage that I lifted the stuff up because I wanted to put a shelf along the wall it had been sitting in front of. I noticed that the tile/road combination was flat again, but assumed it would curl up when given a chance, so I just sat it on a shelf to get it out of the way.
I couple of days later I walked by and happened to notice that IT. WAS. STILL. FLAT.
The rest of my road segments were tile-bound and placed under weights on the garage floor for the following month. Last week I uncovered all the nice, straight road pieces to await a sunny day when I could get decent photos of them…
… and they’re starting to warp again.

Though this time the warping is minor, and I think for the most part they’ll be playable if visually imperfect. Minis only fall over on them now if you place them at the far ends.
I decided to go ahead and take some pictures of them anyway, despite the less-than-great lighting and the fact that I still need to cut and trim the tiles most of them are stuck to. So I grabbed my nice, perfectly straight sidewalks from their storage bin to place alongside the roads, and…
You guessed it…
They’d become warped as well.
In a world less warped than the one we live in, I’d be able to lay out my road pieces and my sidewalks and have some nice flat surfaces to game on.
I’ll probably still get some use out of them, but this is another project I want to redo differently at some point in the future. When that happens, I likely won’t bother with texture unless I can find something extremely fine that can be applied evenly. If I’m going to texture or do anything else that involves spreading on a lot of PVA or other medium that’s prone to shrinkage, I’ll find a base other than chipboard – maybe some ePVC.